It is no longer news that Windows 11 is already running on different devices, however, some PC’s are still not supported due to their specification. But there is an easy way to go about installing it on unsupported devices.
If you’re currently seeing “This PC doesn’t currently meet Windows 11 system requirements” or “The processor isn’t currently supported for Windows 11,” there’s a Microsoft-approved registry hack that should instantly make it better.

How to Install Windows 11 on Unsupported PCs
Step One: Download Windows 11 ISO
Go to Microsoft page, scroll down to Download Windows 11 Disk Image (ISO). Open the Select Download drop-down, pick Windows 11, hit the Download button, select your product language from the Choose one dropdown that appears below, hit Confirm, then click 64-bit Download.
Step Two: ByPass The Registry Check By Editing The REG KEY
From your windows, click Start and type regedit, then hit enter to launch the Registry Editor. Navigate to Computer\HKEY_LOCAL_MACHINE\SYSTEM\Setup\MoSetup, either by pasting that whole address into the box just beneath “File, Edit, View, Favorites, Help” or by drilling down through the HKEY_LOCAL_MACHINE and System and Setup and MoSetup folders one at a time.
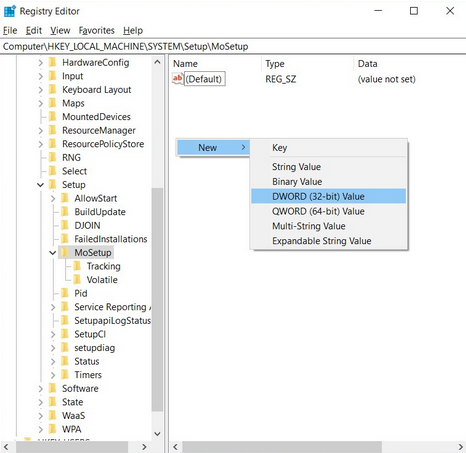
In the right pane, right-click and pick New > DWORD (32-bit) Value. Name the value “AllowUpgradesWithUnsupportedTPMOrCPU” minus the quotes. Double-click on the new value you created, and enter 1 into the Value data field. Hit OK and close the registry editor.
Step Three: Launch Set up
After downloading the ISO in step One, Just right-click on it and pick Open with > Windows Explorer to mount the virtual disc, then double-click the setup file to begin installation.