Good morning every one, I guess we are all enjoying the
beauty of the month. The other day, I shared with us solutions for those who
have been finding it difficult to root their Android device and i’m so glad a
lot of Android device was successfully rooted. If you are still finding it
difficult to root your Android phone, you can always post it here let’s do
justice to it.
I’ll quickly share with us an Android application that is
suitable for every android user for sharing files, applications etc. It’s
called Flash Share.
suitable for every android user for sharing files, applications etc. It’s
called Flash Share.
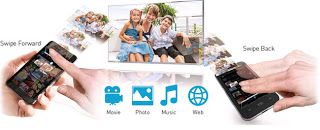
This app is a lot faster than sharing files through Bluetooth and can
send pictures, music, files, even movies from one Android device to multiple
ones. It utilizes your Wi-Fi and Hotspot to create a file sharing connection.
All you need to do is ‘Select and Shake’ for the other person to receive it.
send pictures, music, files, even movies from one Android device to multiple
ones. It utilizes your Wi-Fi and Hotspot to create a file sharing connection.
All you need to do is ‘Select and Shake’ for the other person to receive it.
How Can I Share Applications Through Flash Share?
2.
Open the flash share application on which the
data you want to share with your friend; create your username and add picture
to your account.
Open the flash share application on which the
data you want to share with your friend; create your username and add picture
to your account.
3.
Click on connect with friends, then it will display a dialog box in which you will
see two options “create a
connection” and “scan to join”
Click on connect with friends, then it will display a dialog box in which you will
see two options “create a
connection” and “scan to join”
4.
Open the Flash Share on the device you want to
send it to then click on connect with friends ==> scan to join and a WiFi connection will be establish.
Open the Flash Share on the device you want to
send it to then click on connect with friends ==> scan to join and a WiFi connection will be establish.
5.
Mark the applications/data you want to share with
the other device and shake your phone to send those applications you have
highlighted.
Mark the applications/data you want to share with
the other device and shake your phone to send those applications you have
highlighted.
6.
For the other device who is receiving, go to
history on your Flash Share application and install that setup you just
receive. Your device may complain of data from an unknown source.
Kindly go to your phone’s settings and open applications then check the box
label unknown source.
For the other device who is receiving, go to
history on your Flash Share application and install that setup you just
receive. Your device may complain of data from an unknown source.
Kindly go to your phone’s settings and open applications then check the box
label unknown source.
Once you are done receiving, close your flash share and turn off WiFi
connection in order to save your battery life.
connection in order to save your battery life.
Thanks Yomi, i have been looking for this app. I'll give it a trial and get back to you sir
Plz yomi help me wit de nairabet vfl tricks plz i gat biz am doin as an under graduate
prof
kindly help me on how to root my tecno m3 and my touch 3g slide. can SRS Application root the fone well.
THANK'S PROFYOMI
[email protected]
GUD MORNING PROF
HELP ME WITH D TUN.KO FOR ANDROID FONE, MY DROIDVPN IS REQUESTING FOR IT. AND ALL THE 1 DOWNLOADED IS NOT COMPERTABLE.
FROM [email protected] BB: 22BE1559
@Anonymous6 September 2013 06:40, i'm not into nairabet but i'll make enquiries from my friends who are into it and get back to you
@Anonymous6 September 2013 07:59
How To Root Techno M3
Before i begin, you will need the following
1. PDA.net
2.Eroot
3.PC and internet connection
Once the above is in place,
Follow the below instructions to root your techno M3
===>Download pda.net from google play
install it when prompted for device
type, press other connect as adb
device.
===>Download ERootHere on your PC
===>Run and install it the Eroot. Make sure you have internet connectivity to enable eroot install 11mb of additional data.
===>Plug your Techno M3 to your PC using USB cable
===>The ERoot will show a root button once it detects Tecno M3 press root. And in 10 secs your device will be rooted.
Now, check your Tecno m3 homescreen
you will find superuser.
Once you have super user, reboot your tecno m3 manually and enjoy the ride.
That's it. If you still encounter problem please do let me know.
@Anonymous6 September 2013 08:04
Download tun.ko installer Here or you can equally download it Here
THANK YOU PROFYOMI
4M TECNO M3
@Anonymous6 September 2013 16:27, You are welcome man
Thanks for that but please am looking for watchon app for Samsung galaxy k zoom sm c111